ECM Removal and Inspection in the
Mitsubishi 3000GT/Dodge Stealth

by Jeff Lucius

The "brain" of the 3000GT/Stealth fuel injected engine is the engine control module (ECM) or engine control unit (ECU). This work was performed on a 1992 Dodge Stealth R/T Twin Turbo that has many taps into the connector wires. Always be sure to ground yourself to the car's frame or other part when handling the ECM to avoid static electricity discharge.

Removal

1. Driver seat. Move the driver's seat as far back as it will go.
2. Battery. Disconnect the negative battery terminal. Be sure you have security codes if any devices need them.
3. Left side floor console cover. Pry out the plastic plug near the front of carpeted cover. Pry open the cap on the screw in the middle of the cover. Remove the screw. Start at the front of the cover and pull out and down.

Left side floor console panel

4. Right side floor console cover. Pry out the plastic plug near the front of carpeted cover. Pry open the cap on the screw in the middle of the cover. Remove the screw. Start at the front of the cover and pull out and down.

Right side floor console panel

5. Engine Control Module. The ECM is retained by two bolts on the left side and one bolt on the right side. On the driver's side you may need to move a piece of the harness first to get good access to the bolts. After removing the three bolts, slide the ECM out for easy access to the connectors. If you need to test the ECM or one of its wires, then do not unbolt the ECM. Leave it in place and tap the wires with an analog or digital voltmeter (look at the service manual for which to use for which wires) by prying open the access covers on the back of the connectors. There is one little cover along each long each of a connector. Each cover just snaps and place and can be opened by carefully prying on the side near the wires with your finger tip or small tool. The cover will pivot open and remain attached to the connector.

Right side floor console panel removed

Left side floor console panel removed

ECM on floor

Inspection

While pressing down on the release lever pull each individual connector away from the ECM. You may have to wiggle the connector a little. Once all connectors have been disconnected (the number changed over the years; there are three on OBDI 1991-1993 ECMs). With the ECM removed from the car and on your workbench, remove the four screws from the cover. Mine were on there pretty good so I had to press down very firmly and exert a bit of torque to loosen them. Again, always ground yourself to avoid static electricity discharge to the ECM. Lift the cover off the ECM.

AvPro explains why early model Mitsubishi-built Dodge Stealths and Mitsibishi 3000GTs (1991 through 1994) can have a problem on the ECM motherboard. AvPro says that Mistubishi used Rubycon Electric electrolytic capacitors (I could see the Rubycon label on one my capacitors). These capacitors can leak after prolonged exposure to elevated temperatures. The liquid electrolyte leaking from the capacitor is very caustic and reacts with the metal (circuits) on the board. This can cause unusual and detrimental operation of the engine while the capacitors themselves continue to operate normally.

Inspect the board near the capacitors for any signs of leakage. You may also smell a "fishy" odor if there is leaking. If there has been leakage, the board must be replaced or repaired (capacitors replaced and the board surface thoroughly cleaned). I list ECM repair shops on my Garage Page; or local electronics shops may be able to repair the board. New ECMs cost in the range of $800-1000. Be aware that used ECMs may have the same problem as your ECM. Note that ECMs are fairly unique to each year and model but there is some interchangeability. Replacement capacitors must have the same microFarad rating but can have a higher voltage rating.

John Monnin has additional information on his web page http://www.wrenchmonkey.com/Webpages/ECUrepair.html.

If you want to try replacing the capacitors yourself, this web page has some tips: http://www.tmo.com/howto/ecu1g/caps.htm .

The information in this paragraph comes from Stealth TT owner Max Taylor. Max replaced the leaking capacitors on the ECU and yet still had a problem with no spark to cylinders 1 and 4. He traced the problem to a lack of signal coming from pin 3 on the small vertical board on the ECU. Max found a place that was aware of this problem and knew how to fix it. Contact information is below. Thanks Max!!

Dennis
Whetstone Auto & Truck Salvage
24616 Pleasant Ridge Road
Winona, MN 55987
(800) 328-7759

J.A. Wieman, who has repaired many of our ECMs, had this to say in a June 11, 2010 email to Team3S:
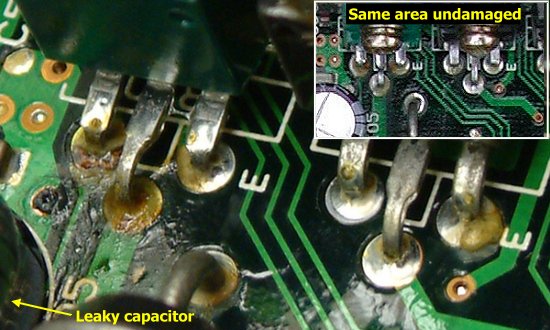
Simple visual inspection will not always reveal the leaking capacitor more often than not.

The only 3/S ECU's that do not have this problem is the 98/99 ECU's in the black plastic case as they use SMT NON-Electrolytic caps. Every other year is at risk and will leak, it is only a matter of time, as well as those already replaced.

This is a known issue with electrolytic caps (short lifespan), not our ECU's or any other design concern.

Electrolytic capacitor life is most often rated in hours at a set temperature. For example, typically as 2000 hours at 105 degrees Celsius (which is the highest working temperature). Sorry to be the bearer of bad news but every 91-97 ECU will eventually fail.

First three links after google-ing "electrolytic capacitors lifespan"
http://www.elna-america.com/tech_al_reliability.php
http://www.eng-tips.com/viewthread.c...=178825&page=1
http://www.hans-egebo.dk/Tutorial/el...capacitors.htm

After you are done inspecting the ECM, put the cover back on and re-connect the connectors. Be sure they snap in tightly.

Go to my web page 2-ecmboard.htm for a detailed view of this ECM motherboard. Thanks to "Quig" on the 3SI message board for the picture of a damaged motherboard below.

Connector release levers

ECU on workbench

Where to look for leaking capacitors

Signs of leaking capacitors

ECM capacitors replacements

Installation

Installation is basically just the reverse of the removal steps. I find it easiest to approximately line up the ECM brackets where they mount on the floor console. Then I go to the passenger's side and insert and tighten that screw by hand. Back on the driver's side, I insert and tighten by hand, using a 10-mm socket and 3-inch extension, those two screws. After all the screws are started by hand I tighten all three using the ratchet.

Attach the battery negative cable and be sure the engine starts and that there is no electrical problem related to the ECM. After that replace the floor console covers.

Back Home Forward

Except for the small gif and jpg images, the content, images, photographs, text, and multimedia displayed are Copyright ©2000-2003 by Jeff Lucius and K2 Software. All rights reserved. No part, section, image, photo, article, or whole of this site may be reposted or redisplayed without permission of the authors.
Page last updated June 11, 2010.