Ignition Timing on the Mitsubishi 6G72
with Adjustment for 1991-1992 3000GT/Stealth DOHC Models
by Jeff Lucius
Introduction
These instructions supplement the service manual's instructions for inspecting and adjusting the ignition timing on the DOHC 6G72 3.0-L V6 in the Mitsubishi 3000GT and Dodge Stealth. Please read all of the instructions before beginning this procedure. Basic ignition timing is adjustable only on 1991 and 1992 models using the crankshaft angle sensor (CAS) located on the end of the left-bank (rear) intake camshaft, just to the front of the throttle body. Beginning with the 1993 models (June 1, 1992 production date) and continuing till the end of production, the crankshaft angle sensor was moved to in front of the engine. The 1993+ sensors cannot be adjusted.
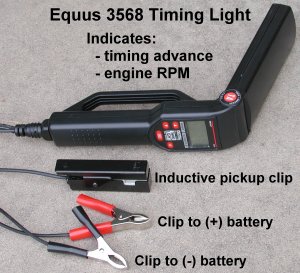
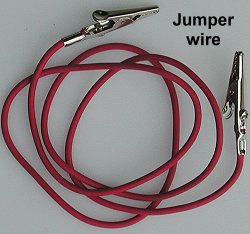
To check the timing you will need, of course, a timing light. Just about any inductive pickup timing light will work. I use the Equus model 3568 (the owner's manual is available at misc/equus3568timinglight.pdf; the 3568 can be purchased for as low as $99.99 from JC Whitney( as the "Deluxe Digital Advance Timing Light, SKU #47ZX1998R) or from http://www.toolsource.com/ (ToolSource part number 73735). This timing light uses an inductive pickup to monitor the firing of cylinder number 1, has a swiveling head with a zenon bulb, and displays both timing advance and engine RPM. For our engines that use a wasted spark ignition system (each spark plug fires twice during the 4-stroke Otto cycle), the RPM display must be divided by 2 for actual engine RPM. The Equus 3568 also provides a "dial back" adjustment. Note that the number in the dial back display must be divided by two to get the actual timing advance because of our wasted spark ignition system. In addition to the timing light, you will need a jumper wire that is 2 to 3 feet long (it helps to have clips on the ends), tools to remove your spark plug cover on the front rocker cover, a paper clip and tachometer if the timing light does not display engine RPM, and a 12-mm open/box end wrench for 1991-1992 models (to adjust the CAS if needed).
Inspection and Adjustment
1. Prepare the engine. Start the engine and let it warm up. Coolant temperature should be between 176-203ºF (80-95ºC); the lights, fans, accessories, and air conditioning should be off; an automatic transaxle should be in park and a standard transaxle should be in neutral; engine idle speed should be 700 +/- 100 RPM. You can determine the engine speed roughly by looking at the tachometer on the dash near in front of the driver, or more accurately by connecting a tachometer to a paper clip inserted into the blue engine speed detection terminal (see the picture below). Turn the engine off.
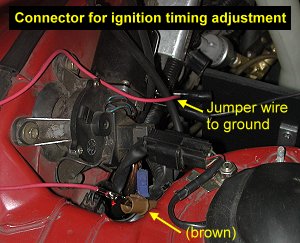
2. Ground adjustment connector. With the engine off, remove the cap on the ignition timing adjustment connector (located in the right rear corner of the engine bay near the battery) by pressing on the lever and pulling. Use the jumper wire to connect the single terminal in the connector to a good ground. Grounding this terminal places the ECU in "basic ignition timing" mode. Do not have a datalogger or MUT connected to the diagnostic terminal. A datalogger or MUT grounds terminal 10 in the diagnostic connector. When diagnostic connector terminal 10 and the ignition timing adjustment connector are both grounded, the ECU goes into "basic idle speed adjustment" mode rather than "basic ignition timing" mode.
3. Connect the timing light. Remove the spark plug cover on the front rocker cover. With the engine off, connect the timing light positive lead (red) to the battery postive post and the negative lead (black) to the battery negatice post or other good ground. Place the inductive pickup around the spark plug wire for cylinder number one as shown below. Note that the cylinder number for each coil lead and spark plug wire are stamped into the top of the coil bracket.
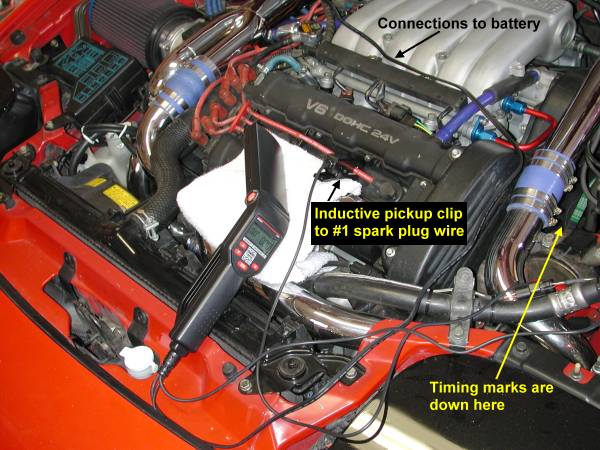
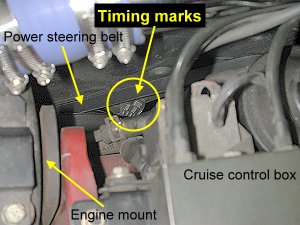
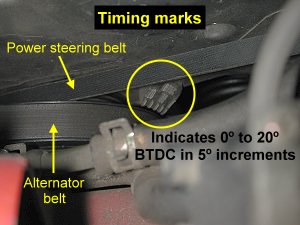
4. Start engine. After everything is connected, start the engine and let it idle. Be sure operating conditions are again as specified in step 1 above. Aim the timing light at the timing marks and observe the position of the timing notch on the crankshaft pulley. The notch should be very steady and located near the 5º mark (between the indicated 0 and 10 marks). The best location to see the notch's position accurately with respect to the timing marks will be far rearward in the engine bay; not from the position the pictures below were taken. If the notch appears to be jittery, check again that a datalogger or MUT is not connected.
Basic ignition timing is 5º +/- 2º for 1991 and 1992 models and 5º +/- 3º for 1993+ models.
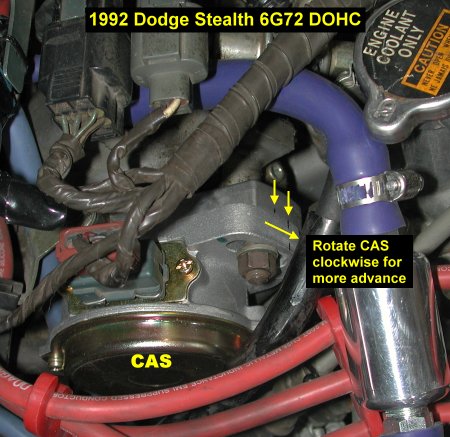
5. Adjustment. The basic ignition timing is adjustable only on 1991 and 1992 models. For your 1993 and newer DOHC engine, inspect the CAS if the basic timing advance is out of specification. For SOHC engines, see the service manual instructions for adjusting the distributor. For DOHC engines, the basic timing can be adjusted by loosening the CAS mounting nut. Rotate the CAS clockwise to increase timing advance; and counterclockwise to retard timing. I set my basic ignition timing advance to 7.5º BTDC. This is just out of spec for 1991-1992 models and within spec for 1993 models. Depending on how well detonation is controlled with my water injection system, I may experiment with increasing advance to 10º or so.
Be sure to tighten the CAS mounting nut after adjustment is complete.
6. Idle timing. Turn the engine and ignition switch off. Remove the grounding jumper wire from the ignition timing adjustment connector. Start the engine and again observe the location of the notch with respect to the timing marks. The notch may now appear to be "jittery". This is normal. Warm idle timing advance should be about 15º BTDC. At higher altitudes, timing advance is automatically increased by about 5º to 20º BTDC. Timing may increase beyond the 20º BTDC if you increase engine RPM. A "dial back" indicator on the timing light will help you find the actual timing advance when this occurs. Increment or decrement the timing advance on the "dial back" until the notch is at or near the 0º mark. Read the timing light indicator for the timing advance and divide the number by two to get the timing advance. We have to divide by two because our wasted spark ignition system fires the spark plug every revolution instead once every other revolution.
7. Remove timing light. Turn the engine and ignition switch off. Disconnect the timing light. Install the spark plug cover. Put the ignition timing adjustment connector cap back on. Remove the tachometer and paper clip if used.
Page last updated July 10, 2004.