Amateur's Guide to Paint Restoration

by Jeff Lucius

Overview

Let me start by saying I am in no way at all any kind of an expert on washing, cleaning, or protecting the paint on a car. I put these tips together just to relate my recent experiences with improving in a dramatic way the overall appearance of my old beat up 1992 Dodge Stealth. Please check out the links below (and there are many others) for much better explanations and descriptions of caring for the paint on your car.

     Car Care Specialties
     Meguiar's
     Zaino Bros

Replacing the rear bumper cover on my car with a used one provided me the opportunity to take these pictures and demonstrate how easy it is to restore faded paint to like new condition. However, the method presented here cannot repair deep scratches (ones that you can feel with your fingernail or that go through the paint to the surface below). This work was performed on the plastic bumper (it took about 1 hour) but I have done the same thing to my entire car. It took about 8 hours of hard work and an entire bottle of Meguire's #2 to partially restore the paint's appearance on my car. It was worth it as the safe viewing distance was reduced from 20 or more feet to about 5 feet. If you have some tips or corrections you want to share with me so I can pass them on through this document, then please email me at paintcare@stealth316.com.

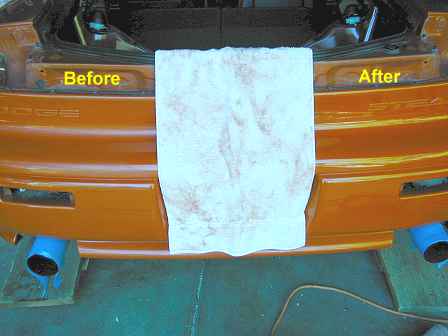
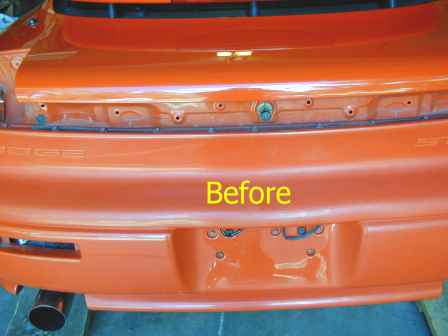
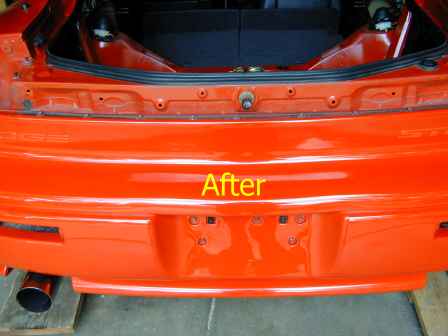
WARNING. Deep cleaning will remove any wax and clear coat that is present in the area you are working on. The techniques presented here require removing some oxidized paint to reveal good paint below. So, clear coats will be destroyed!

Tools

I choose Meguiar's products because of their reputation and easy availability. I used Meguiar's Mirror Glaze line of products, specifically:


Some people recommend applying all products by hand. However, I used a 9-inch buffer/polisher from Sears (model 646.10659, about $100) and foam bonnets (yellow or blue, $5-7 each) for cleaning and waxing. Use 100% cotton towels to wipe off all products. A portable high-output lamp is handy for highlighting areas as you work. I also used some carpet on the floor to protect my knees. To protect parts of the car, like metal parts and plastic or rubber moulding, I used blue "Clean Release Masking Tape". It leaves no residue (great for windows and such inside your house too).

The products

Tools

Steps

1. Wash. You need to wash the area first. You can use dish detergent if you want because the next step is going to take off any wax missed by the detergent. A gentle car wash product is fine too, just be sure to remove any road tar or bugs from the area to be restored. The rules are simple: work in the shade and with a cool paint surface; use cool water; use a gentle spray from a hose to wet the car and wash off large stuff; use a wash mitt, pad, or sponge and rinse it often (in a separate container from the wash); start at the top - wet, wash, rinse - then work toward lower sections; dry the car as soon as possible with a 100% cotton towel.

2. Clean. Cleaning your paint means removing contaminants and oxidation, adding oils, and smoothing the surface. For some explanations of what cleaners, glazes, polishes, and waxes are and how to use them, check out the following two links.

     Thomas Nast's Guide to Using Meguiar's Products
     Car Care Specialties' Cleaning Paintwork

Mask off the areas that you do not want to be abraded, especially rubber, rubber coated, or plastic trim. Better is to remove the trim or fixture if you can. Apply a little bit of Mequiar's #2 Cleaner to the foam bonnet on the polisher. Place the polisher against the section of car you will be working on and start the polisher. You do not need to apply a lot of pressure, but if you ease up too much polishing compound may spray about and the bonnet itself can come off. Work the polisher in a back and forth motion, and change directions often. You will get the feel for it pretty fast. Work in a small area; say a few square feet. Even though the foam bonnet is pretty forgiving, you need to be careful using the machine polisher near the edges of your bodywork and along ridges. When the polishing compound is almost dry (I swipe a finger across the compound on the car), stop, apply some more compound to the bonnet and move on to another section. If the bonnet gets torn or soaked with compound and removed paint, replace the bonnet.

An advantage of the Mequiar's cleaners is that the abrasive is a clay compound (not silica or "sand") and the more you work it in the finer it gets. I had no instances of cleaner-induced scratches on my entire car. You may need to repeat many times to get the surface appearance you desire, but it is much better to keep taking a little off each time than a lot all at once. Use a clean 100% cotton towel to wipe off the cleaner completely between applications. My 100-lb wife demonstrates in the pictures below that a lot of muscle is not required.

Applying to buffer

Applying to car

You can see on the yellow bonnet above and on the towel below that red paint is coming off. This must happen to remove the oxidized (dull looking) paint. Look at the before and after pictures below. The difference is obvious. Once you are done with the #2 Cleaner then make a pass or two using the #9 Swirl Remover on a fresh bonnet. Wipe the polish off with a clean 100% cotton towel. The bonnets that were used to apply the cleaner and polish can be washed out by hand and reused if not torn.

Side-by-side comparison

3. Protect. A wax coating on the paint protects it and acts as a sacrificial surface for mechanical and chemical attacks on your car. Car Care Specialties talks about the subtleties of protecting your paint at the link below.

     Car Care Specialties' Protecting Paintwork

I applied Meguiar's #26 with the polisher and a fresh foam bonnet then used a cotton rag to touch up at the edges. You can also remove the bonnet and use it to hit the hard to reach areas by hand. Wipe off the wax with a clean 100% cotton towel and you are done. I have not found a good way to clean the wax off the bonnet so I just throw it away when finished.

Before restoration

After cleaning and polishing


Back Home Forward

Except for the small gif and jpg images, the content, images, photographs, text, and multimedia displayed are Copyright ©2000-2003 by Jeff Lucius and K2 Software. All rights reserved. No part, section, image, photo, article, or whole of this site may be reposted or redisplayed without permission of the author.
Page last updated September 25, 2003.