Rear Compartment Trim Panel Removal
on the Mitsubishi 3000GT/Dodge Stealth
by Jeff Lucius
Overview
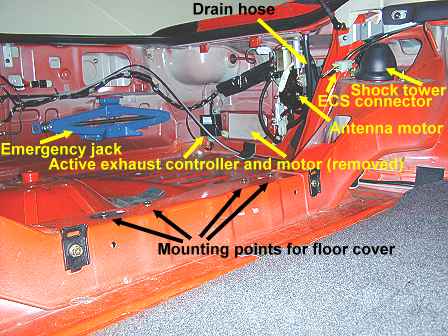
Removal of the trim panels and storage bins in the rear storage compartment provides access to
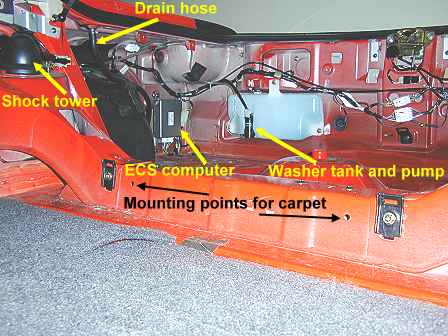
several important components of the car:
- electronic control suspension (ECS) control unit
- active exhaust control unit and actuator assembly
- motor antenna control unit
- fuel pump assembly
- rear washer tank assembly and motor
- ECS rear shock absorber electrical connectors
- drainage tubes for the rear hatch
- rear garnish mounts
- rear bumper cover mounts
The only tools needed are #1 and #2 Phillips screwdrivers and 1/8" slotted screwdriver. I use plastic storage containers or bags to keep all the little parts sorted and not lost. All pictures are placed near the end of this note.
Removal
Before you begin, remove the retractable privacy cover from its brackets and fold down the rear seat backs.
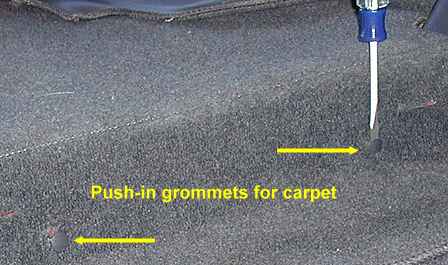
1. Carpet. Remove the 2 push-in grommets that attach the carpet to the
body behind the rear seats and remove the carpet. A flat-head screwdriver can
help with the carpet grommets if you can't pull them out by hand.
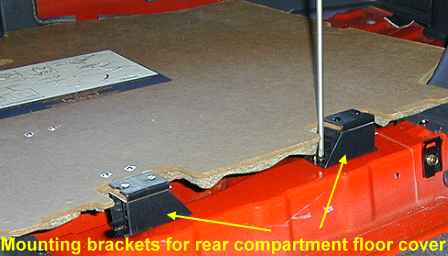
2. Floor cover. Remove the 4 Phillips-head screws that attach the floor
cover mounting brackets to the body and remove the cover.
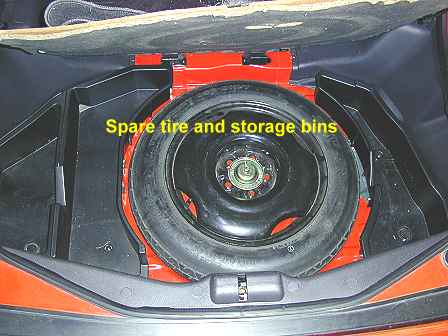
3. Spare tire and storage bins. Remove the spare tire and the two
storage bins.
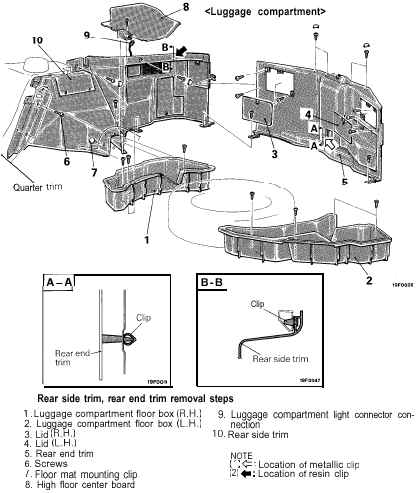
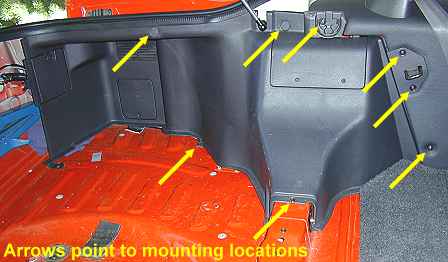
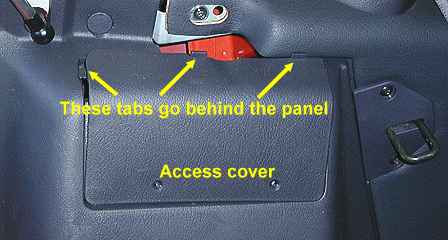
4. Rear trim. Remove the small plastic plugs from the top of the rear
trim with your fingernail or small flat-head screwdriver. Remove the two upper
access lids. Remove all the screws: 4 brass screws on top, 2 large black screws
on the base, 2 small black screws on the vertical surface, and the 4 brass
screws located under the access lids. Pull the panel away from the car. There
is a clip in the lower middle of the panel; just pull out on the panel from the bottom.
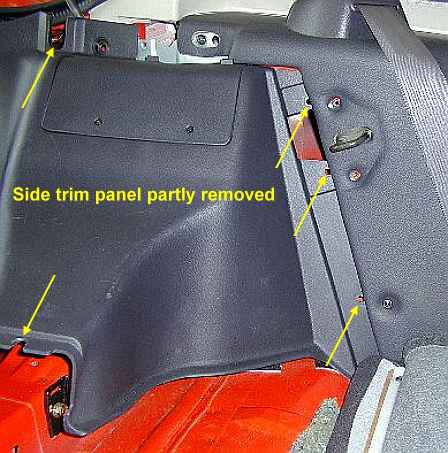
5. Side trims. You can take either side panel off first. I'll describe
the procedure for the left (driver's-side) panel in detail. Remove the bracket
for the retractable cover. You can remove the access panel to the rear shock or
leave it on; if it is off it may be easier to re-install the panel. Remove the
2 large black bolts that hold the cover over the rear seat back latch and the
one smaller black bolt below these. Remove the two plastic plugs near the top
of the panel and the two black screws beneath them. Remove the 2 small black
screws on the base of the panel (one is in the raised part of the cross-brace).
Start working the panel loose at the back. There is one clip near top; just
pull out on the panel. Work your way forward pulling the bottom out then
bending the panel out around rear hatch shock mount while sliding the front
back and out from under the quarter trim. The operations are similar for the
right side panel except after you pull out the back of the panel a little you
need to disconnect the compartment light electrical connection. There is no
need to take the light's plastic cover off.
Installation
For installation, just reverse the steps above. For the side panels, start at the front and work your way back. Be sure to re-connect the compartment light electrical connection.
Page last updated March 17, 2002.