Air Conditioning Troubleshooting Tips
for the Mitsubishi 3000GT/Dodge Stealth

by Jeff Lucius

Introduction

If a problem occurs with the air conditioning, there is some simple troubleshooting we as owners can perform to determine the likely cause. If the air conditioning stops working properly, for example, if the air is not cold or the fan does not run, the service manual provides troubleshooting tables (separate tables for manual and auto systems) and service adjustment procedures to help us identify the likely cause. The tips presented here help with some of the simpler tasks. I very much encourage you to read the AC sections of the service manual before attempting any of the procedures shown here and to learn of other test procedures not discussed here.

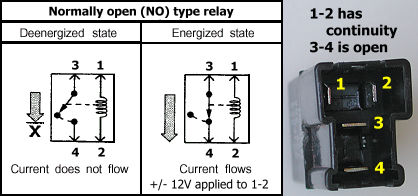
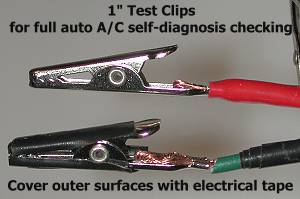
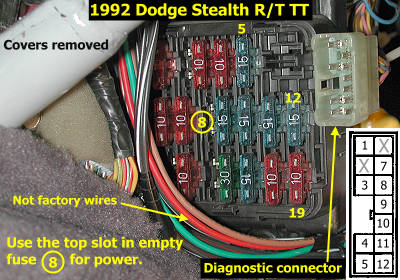
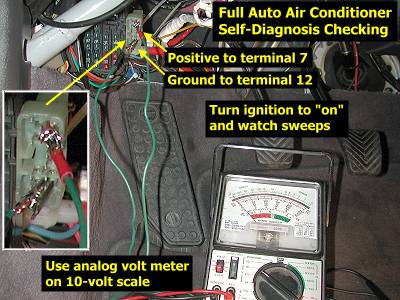
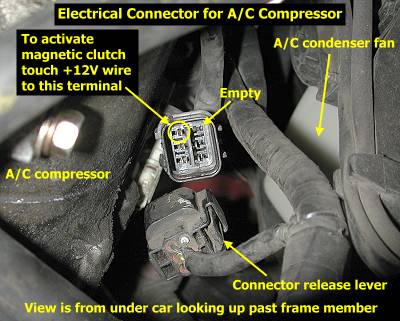
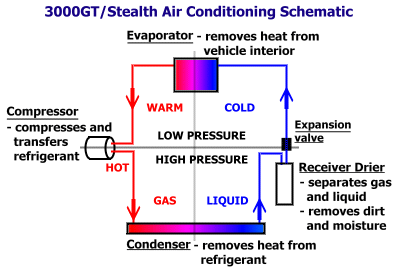
Because of Federal laws, the potential for freon to deplete the ozone layer 10 to 30 miles above the earth's surface, and the danger of exposing skin to very cold evaporating refrigerant, special precautions must always be used when handling the refrigerant in the air conditioning system. Deliberate venting of CFC-12 (also known as R-12, freon-12, or the trade name Freon) to the atmosphere has been prohibited since 1992 and release of HFC-134a (also called R-134a) has been prohibited since 1995. HFC-134a has been in use in USA cars since the 1994 model year. Unless you are certified to perform this type of work and have the necessary equipment, do not attempt any repair procedure that might allow freon to be released. If you must evacuate the freon to effect a repair, have a certified shop remove the freon for you. You should get a credit from them toward recharging your system. Do not release the refrigerant into the atmosphere!

My car is a 1992 Stealth R/T Twin Turbo with auto air conditioning. The symptom I had was no cold air coming out when the AC operated. For background information, I bought the car used in 1997 with 53,000 miles on it and the AC worked fine. The AC system was intact but not operated from September 1997 till late in 1998 while the engine was being rebuilt. Starting in 1999, my car also is in storage for about 6 months out of each year. During storage I periodically started the engine and maybe drove the car up and down the street but I did not always run the AC or defroster. The AC seemed to worked fine until June 2001, when the air stopped being cold. I had a Midas shop check the system for leaks (they said there were none) and recharge the almost empty system; mine takes 960 grams (2.11 pounds or approximately 34 ounces) of R-12. Four months later, cold air was again not coming out of the system. In June 2002, I decided to inspect what I could of the AC system to determine what is wrong.

Here is a tip that should be obvious. If the system is low on refigerant then there must be a leak somewhere. Refrigerant is not consumed. It is not normal for refrigerant to be lost over time unless there is a leak. Most likely the leak is in one of the rubber hoses, an o-ring at a pipe coupling, or the seals in the compressor or around the compressor shaft. You will almost always see deposits of grime near the leak because the AC compressor lubrication oil also leaked out with the refrigerant. My lack of knowledge and the Midas shop's lack of thoroughness or concern resulted in the simple recharge of my air conditioning, rather than a repair of the leaking component(s), and subsequent loss of about $150 worth of freon.

General Troubleshooting

The schematic below of our car's air conditioning system shows the major mechanical components, their functions, and how the system is divided into low and high pressure sides and cold (liquid) and warm/hot (gas) sides. The compressor is the heart of the system, compressing and pumping the gaseous refrigerant through the system. Liquid refrigerant should never enter the compressor. The refrigerant changes from gas to liquid inside the condenser, located in front of the radiator, as heat is removed from the refrigerant. The expansion valve, located on the evaporator in our cars, controls the flow of liquid refrigerant through the system and changes the pressure from high to low. Refrigerant changes from liquid to gas in the evaporator, located behind the glovebox, as heat is absorbed from the passenger's compartment. For a concise summary of problems that can occur in this system along with causes and solutions, take a look at iCARumba's web page Troubleshooting Basic Air Conditioning Problems.

AC system diagram

The electrical and electronic control of our AC system depends on whether the manual or full auto version is installed. There are very specific guidelines in the service manual for troubleshooting each type of system. For the particular symptom I had, no cold air coming out, the service manual lists the following 11 items to be checked in the order given. Notice that the refrigerant amount is not a list item, but that is covered elsewhere (see sight glass inspection). Also, the manual recommends physical inspection of the refrigerant lines (hoses and pipes).
  1. Fuse
  2. AC control unit diagnosis outputs
  3. Sensors
  4. Air mix damper motor and potentiometer
  5. Heater link
  6. Harness - including connectors
  7. Compressor relay
  8. Magnetic clutch
  9. Water temperature switch (the coolant temp sensor found on 1991-1992 models)
  10. AC control panel
  11. Belt lock controller (located under the glove box, it compares the engine and compressor RPM and turns the compressor off if there is a significant difference)

I thought checking all of these items would be a formidable task, so I decided to eliminate some based on the proper operation of other AC components. Because the AC appeared to operate normally, except for no cold air, I could eliminate items 1, 2, 3, 6, and 10. I decided to check items 1 (fuse) and 2 (self-diagnosis check) anyway because they are so easy. Items 5, 6, 10, and 11 did not concern me too much because of the nature of the problem. I really suspected that the freon had leaked out or that there was a problem with the compressor. If it turns out that freon is near full charge and the compressor is fine, then the problem could be a clogged expansion valve or receiver drier, either of which would prevent circulation of refrigerant.

After performing the tests below I took the car into an AC shop (Maxair in Golden, CO) and they performed a leak test using dye and an ultraviolet lamp (dye tests are not recommended for the newer R-134a systems). They determined there was no freon in the system, that the discharge hose leaked (see my inspection of this hose in the "Refrigerant Lines" section below), and that the seals in the compressor were bad. I decided to repair all items myself, but that is a subject for other web pages. You should be aware that Mitsubishi no longer sells or stocks new "R-12" compressors (model FX105VS), used in 1991-1993 3000GT/Stealth models. Buying a remanufactured compressor is very much recommended over buying a used compressor. You really have no idea what the condition of the seals are in a used compressor, especially if it has been sitting unused for any period of time. Prices for a remanufactured "R-12" compressor with clutch range from about $300 to about $600, depending on the source. You can also have your compressor rebuilt. Other components, except maybe the hoses, should be fine if used (still test them, of course) except for the receiver drier. If a used (or new) receiver drier has been exposed to the atmosphere for any length of time it has absorbed moisture and its effectiveness reduced. Fortunately, a new receiver drier is relatively cheap ($50 to $90).

Site-Glass Condition and Receiver Drier

The first thing I did was check the site glass condition after the AC system had been running for several minutes. The site glass is the small circular window in the top of our receiver drier (see picture in next section). The table below shows the four usually observed conditions and their causes. If the site glass condition is not OK, then the AC system needs to checked or charged. My observations were that the site glass was clear but there was no cold air (no freon in system). A year earlier (2001), the site glass showed constant bubbles and the air was cool but not cold (undercharged system).

To check the receiver drier itself, check the temperature of the two pipes connected to it. If there is a difference in temperatures (and I assume this means when cool or cold air is coming out of the vents), the receiver drier is restricted and should be replaced. The service manual includes a strong caution concerning the receiver drier. Because it contains dessicant that will absorb atmospheric water quickly, the receiver drier must be sealed while in storage. Additionally, exposure to the atmosphere must be minimized during installation. Obviously, do not purchase a used receiver drier as it will most likely be useless. No similar warning appears for the other major components (evaporator, compressor, and condenser) so I assume it OK to expose these components to the atmosphere or to buy them used (assuming they work properly and do not leak).

Common Site Glass Conditions
Observation Cause
  • Site glass is clear.
  • Air is cold.
  • Magnetic clutch is engaged.
  • Compressor inlet line is cool.
  • Compressor discharge line is warm.
System has a full charge.
  • Site glass is clear.
  • Air is not cold.
  • Compressor inlet and discharge lines
    are same temperature.
Very little or no freon in system.
  • Site glass shows constant bubbles,
    foam, or oil streaks.
Undercharged system.
  • Site glass is clouded with milky fluid.
Receiver drier is leaking dessicant.


AC Fuse and Relays

The fuse is an easy and obvious item to check whenever there is a problem with a component. The AC system fuse is located under a marked plastic cover in the engine bay near the driver's side fender. Using your fingers, pull up on the outboard "latch" first, then the inboard one to remove the cover. Pull up on the outboard fuse (wiggle it ever so slightly if needed) and inspect it to be sure it is OK. I like to use a hand magnifying lens to be sure there is not even a tiny break in the metal loop in the middle of the fuse. As I suspected, the fuse was fine.

AC fuses and relays


Even though relay failure is extremely rare, you should still check the relay(s) for the component of concern. Using a helpful tip from fellow 3000GT/Stealth owner Steve Keaveney, I found the relays can be easily removed using a flat blade screwdriver to pry on the indent on the side of the relay at the same time as I pulled up and wiggled the relay front to back.

Removing relay 1    Removing relay 2

The relay is checked first without power applied to the terminals marked 1 and 2 in the schematic and picture below. There should be continuity with resistance between terminals 1 and 2. Check for continuity by setting your volt-ohm meter (VOM) to take resistance measurements (ohm scale) and touch the two probes to the 1 and 2 terminals. I measured 82.2 ohms (80 to 90 ohms is typical for coil resistance in automotive relays). Next test for continuity between terminals 3 and 4. There should be none, that is the terminals are open and your digital VOM will read "0" and the needle will not move on an analog VOM. Now apply +12 volts from a car battery to either terminal 1 (or 2) and then ground terminal 2 (or 1) to the battery. Be sure you insulate your probes from each other with a piece of cardboard or rubber and that the probes do not touch terminal 3. You should hear a click as the switch inside the relay closes. Your VOM will show a continuous connection with very low resistance.

AC relay 3

Self-Diagnostic Check

The full auto AC self-diagnosis basically checks to be sure that AC-related sensors, potentiometers (variable resistors), and motors are functioning properly. The full auto AC control unit performs self-diagnosis checking whenever there is an automatic cancellation without cancel switch operation. You can check the diagnosis using the following procedure. When I performed this check, the system reported normal.

It is very important to note that the diagrams and some instructions in the 1991 3000GT, 1992 Stealth, and 1992-1996 3000GT manuals for this check are incorrect. In particular diagrams 20F0083 (1991 and 1992 manuals) and Z20F0165 (1992-1996 manual) are wrong. The first one incorrectly identifies the diagnostic terminals and the second incorrectly states to use terminal 6 for ground (rather the correct terminal 12). The 1991-1993 diagnostic connector terminals are correctly identified on my web page 2-diagconn.htm.

  1. Connect an analog voltmeter to terminal 7 and ground terminal 12 of the diagnostic connector (OBDI). For 1994 and later models, please refer to the service manual for the location of the diagnostic connector and which terminals to use. Use small (1 inch) test clips with a small amount of protective electrical tape added to connect to the diagnostic connector terminals. Set the voltmeter to the 10-volt range. I saw needle deflections up to about 7.5 volts.
  2. Turn ON the ignition switch. Do not start the engine.
  3. Observe and note the voltmeter needle deflections. If two or more conditions exist, the code patterns are alternately displayed repeatedly. If everything is OK, the needle will just fluctuate back and forth continuously. Use the service manual's Diagnosis Display Patterns and Codes table to read the patterns.

test clips

1991-1993 Diagnostic connector

AC self-diagnosis check

Magnetic Clutch

A drive belt connected to a crankshaft pulley turns the AC compressor pulley, which is mounted on the end of the compressor. So that the compressor is not always turning, there is a magnetically operated clutch between the pulley and the compressor. When the AC is turned on, the magnetic clutch is activated. The operation of the magnetic clutch can be checked with the engine and ignition off by connecting the positive battery terminal to terminal 1 in connector B-20 near the compressor. Connector B-20 can be seen from above but is accessed from below.

Place the front tires on ramps or otherwise securely raise and support the front of the car (2-raisecar.htm). The connector is close to and inboard of the compressor, near the condenser fan. It took me a while to separate the connector because there is only room for one hand up there. Squeeze firmly on the release lever and pull down at the same time. I used a length of 18-ga wire and the two jumper wires with test clips used in the self-diagnostic check to connect the battery to terminal 1 of the connector. Terminal 1 is the one next to the "missing" terminal. There is a spark produced when the wire is touched to the terminal. A significant sound is made if the magnetic clutch is activated. My magnetic clutch passed this test. After finishing the test, put the electrical connector back together. Again, this is a one-handed operation.

AC Ccompressor electrical connector

Refrigerant Lines

It is not easy to inspect all the refrigerant lines and I did not perform this inspection. However, when testing the magnetic clutch I observed something unusual about the refrigerant hose that runs near the compressor. This piece of hose is maybe a foot long and loops down below the compressor. This is the discharge hose with one end connected to a pipe that goes to the condensor and the other end connected to the compressor. What I noticed is an accumulation of dirt and grease on the bottom 2 to 3 inches of the hose, but no grease or oil above that point. In other words, the grease did not appear to have run the down the hose from another source. The hose itself also appeared to be slightly swollen and maybe a little softer compared to the dry sections above the greasy section. I suspect there is a very small leak in this portion of the hose. The grease is the internal lubricant used in the refrigerant lines. When I took the car in to the AC shop, they checked this area after a dye was introduced under pressure into the AC system. This hose leaked. A replacement was "only" $70 from Tallahassee Mitusbishi (25% off list prices for Team3S and 3SI members). The AC shop also noted that the compressor leaked. This should have been obvious to me because the compressor was covered in grime. Again, the grime is from the compressor lubricating oil that leakes out with the refrigerant.

This concluded the tests I and the AC shop made. I have ordered the discharge hose, a remanufactured compressor assembly with clutch ($290), and an aftermarket receiver drier ($30). My web page with tips on how to replace the comprressor is at 2-ac-compressor.htm. List price for the compressor, if it was still available, was about $710, for the compressor clutch assembly was about $337, and for the receiver drier assembly was about $98.

If you are looking for remanufactured AC components, including the compressor assembly, then consider contacting Hancock Industries located in Abilene, Texas (1-800-289-8282). I purchased a reman'ed FX105VS compressor with clutch from them for $289.59 plus core charge and a receiver drier for $29.49. These prices are excellent compared to the quotes I received from many local sources.

Links

Aircondition.com by the Automotive Air Conditioning Information Server
How an Automotive Air Conditioner Works by Patrick Parish
Air Conditioning by www.icarumba.com
Air Conditioning Systems by Chris Bede
Air Conditioning Fact Sheets by US EPA
Troubleshooting Basic Air Conditioning Problems by www.icarumba.com

Back Home Forward

Except for the small gif and jpg images, the content, images, photographs, text, and multimedia displayed are Copyright ©2000-2002 by Jeff Lucius and K2 Software. All rights reserved. No part, section, image, photo, article, or whole of this site may be reposted or redisplayed without permission of the author.
Page last updated July 31, 2002.