Fuel Supply Line in Engine Bay Upgrade
for the Mitsubishi 3000GT
and Dodge Stealth DOHC Models

by Jeff Lucius

Introduction

The factory high-pressure fuel supply line in the engine bay connects to the fuel filter with a banjo bolt. The hose part of the line is re-inforced rubber (of some sort) with a 1/2" (12.7 mm) outside diameter and about 5/16" (8 mm) inside diameter. The hose is permanently clamped to a metal pipe that attaches to the front fuel rail. The opening in the banjo bolt is 3/16" (4.76 mm). The opening at the fuel rail is 7/32" (5.56 mm). This web page shows how to replace the fuel-supply line in the engine bay with -6 AN braid-protected hose with an ID of 11/32" (8.7 mm). My web page 2-ek2mfg-fuelrailkit.htm shows how to replace the crossover pipe between the two rails. For instructions and tips for replacing the fuel return line in the engine bay and the fuel pressure regulator (FPR) see my web page 2-fpr_upgrade.htm. Using the tips and instructions on these web pages you could design and build a dual feed and return setup for your engine.

Parts and Supplies

Fuel rail adapters 
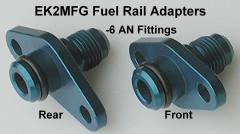
Before begining this project you will need to purchase a set of fuel rail adapters from EK2MFG (Bob Koch). Bob has these adapters built to his specifications and anodized. He sells them on eBay as seller jckbkoch. You can also buy them direct from him by email at ek2mfg@comcast.net or at his web site http://www.ek2development.com/. Even a quick glance at Bob Koch's fuel rail adapters shows that these are little jewels. They are carefully and precisely crafted, and are anodized to a color blue similar to typical AN fittings. They also fit perfectly onto the ends of the fuel rail and do not leak when installed correctly. These fuel rail adapters make it simple to replace the factory supply and return fuel lines and the crossover pipe with aftermarket hoses and pipes that utilize AN fittings at the rail ends. The "front" and "rear" annotations in the picture refer to the supply and return side of the rails (where we will be working). Reverse the annotations for the crossover pipe side of the rails. The adapters come with o-rings, 1/4" split spring washers, and M6x1 socket head cap screws.

Replacement parts

You will need some AN fittings and adapters as well as some hose. I used Earl's Peformance Plumbing Peform-O-Flex stainless steel braid-protected synthetic rubber hose and Earl's (owned by Holley) or Aeroquip (owned by Eaton) fittings and adapters. Russell Performance (owned by Edelbrock) also makes hoses, fittings, and adapters. If you use a different fuel hose, you will need the correct hose ends for that type of hose. The picture above identifies all the parts I used to connect the front fuel rail to the fuel filter. I show two options. If you want to install a fuel pressure sensor in this line, option 2 shows one way to do this. Option 1 shows a simpler setup. This web page shows how to install option 2 with a fuel pressure sensor.

You can buy AN fittings at the stores below either online or by phone. Shop around to compare prices and be sure to check on availability. Look in your local Yellow Pages under "Auto Peformance ..." for local shops that carry Earl's or Aeroquip fittings. That is how I found Motorsports Supply (listed below). Their prices are similar to or less than the lowest online prices and they are in the Denver, CO metro area where I live. They will ship anywhere in the USA.

       Summit Racing     Aeroquip, Earl's, Russell     http://www.summitracing.com/
       Fluid Systems Engineering     Earl's     http://www.fluidsystemseng.com/
       Pit Stop USA     Earl's     http://www.pitstopusa.com/EARAN-ANADAPTERS.asp
       Earl's Performance Products     Earl's     http://www.earlsperformance.com/
       Jeg's High Performance     Aeroquip, Earl's, Russell     http://www.jegs.com/
       Pegasus Auto Racing Supplies     NA     http://www.pegasusautoracing.com/
       American Street Rod     Earl's     http://www.amstreetrod.com/
       Tognotti's Auto World     Earl's     http://www.tognottisautoworld.com/Products/Earl/default.htm
       Behrent's Performance Warehouse     Earl's     http://www.behrents.com/
       MotorHead.com     Earl's     http://www.motorhead.com/
       ANPlumbing.com     Earl's     http://www.anplumbing.com/
       Baker Precision     Aeroquip     http://www.bakerprecision.com/aqp.htm
       Stock Car Products     Aeroquip     http://www.stockcarproducts.com/aqpindx.htm
       The Race Depot     Aeroquip     http://www.theracedepot.com/product9.htm
       Racer Parts Wholesale     Aeroquip     http://www.racerpartswholesale.com/
       Martel Brothers Performance     Aeroquip, Russell     http://www.martelbros.com/

      Motorsports Supply, 7200 E.54th Place, Commerce City, CO 80022 (phone: 303-287-1731, 1-800-288-5202)


If you want to install a fuel pressure sensor, then it goes somewhere between the fuel filter and the FPR. An aftermarket FPR with a 1/8 NPT port is an ideal place to mount a fuel pressure sensor or gauge. The next best place would be between the rear fuel rail and an aftermarket FPR. The crossover pipe area is another option. Lastly, and perhaps the easiest and with the most room, the supply hose after it leaves the fuel filter (on its way to the front rail) is a satisfactory location. When I upgraded my FPR I installed a new AutoMeter Electric Fuel Pressure Sensor, model 3363 shown in the picture below, using the NPT port on the Aeromotive A1000-6. Because I had an older version of the 3363 and I am curious if there is a pressure drop between the fuel filter and the FPR, I decided to install the older model 3363 near the fuel filter. I can remove the pressure sensor later and either install a plug in the adapter or remove the adapter completely. Ignore the sections dealing with this sensor's installation if you are going to mount a sensor or gauge elsewhere or not at all. My web page 2-fp_install.htm has tips and instructions for mounting fuel pressure sensors. I found http://www.egauges.com/ to have the best online prices for AutoMeter gauges. I paid $185.90 (includes shipping) for the AutoMeter 3363.

AutoMeter electric fuel pressure gauge model 3363

In addition to the fuel rail adapters, fuel hose, AN fittings, and optional fuel pressure sensor or gauge, the tools and supplies required for this project include slotted and Phillips screwdrivers, pliers, 10-mm, 12-mm, and 19-mm sockets and wrench with 3" and 6" extensions and breaker bar to go over the socket wrench handle, 10-mm open/box-end wrench, 5-mm hex key (for the fuel rail adapter screws), -6 AN (or 11/16" open-end) wrench, 13/16" open-end wrench, 7/8" open-end wrench (only for the pressure gauge adapter), 3/4" (or 19-mm) open-wrench, a bench/table vice, a sharp 32-teeth per inch hacksaw blade, duct tape, engine oil or Earl's assembly lube, a fine-tip permanent marking pen, sharp wire cutters, some paper, some string, Teflon tape or thread sealant (only if installing a fuel pressure sensor), safety glasses, and some rags.

Costs (round numbers, no tax or shipping)
Please read all of these instructions before beginning this project, and plan ahead for parts. Once you have the parts in hand, this project should only take you an hour or so.

Remove Factory Supply Hose

1. Relieve fuel line pressure. In the rear storage compartment, remove the carpet (velcro and push-in clips) and particle board floor (4 Phillips screws), or just raise these up out of the way. Remove the spare tire. Remove the passenger's-side storage bin (3 Phillips screws). Remove the access cover to the fuel pump (4 Phillips screws). Separate the electrical connector by pressing down on the tab and pulling that piece toward the front of the car. You do not need to remove the blue filter as suggested in the picture below. In the left picture, the wires shown running under the assembly cover are part of my fuel pump re-wire and are not present on a factory setup. Try to start the engine. It should not start because the fuel pump has no current to it.

Remove the negative cable from the battery. Be sure you have any security codes that might be needed when the battery is disconnected.

Fuel pump assembly cover    Fuel pump wiring harness connector

2. Remove the battery and washer tank. Follow the instructions and tips on my web page 2-batteryout.htm to remove the battery, tray, and washer tank. This will give you good access to the fuel filter, shown in the picture below. Also shown is a fuel pressure sensor with adapters in the factory hose. This is the older model 3363 sensor I will re-use in the new setup. I also removed the air filter and MAS for my ARC2 setup to avoid damaging these parts.

Factory FPR location


4. Remove the supply line. Wrap a rag around the filter to absorb any gasoline that might drain out after the banjo bolt is removed. This gasoline should not be under pressure. However, as a precaution wear safety glasses to protect your eyes when removing the hose. Because gasoline contains carcinogens such as benzene, avoid letting the gasoline contact your skin. And, of course, do not ingest gasoline and avoid breathing fumes. Gasoline is poison as well as a fire hazard. Using a 19-mm (or 3/4") wrench below the banjo bolt to hold the filter steady, loosen the banjo bolt using a 19-mm (or 3/4") socket and wrench. I found that a breaker bar was needed to break the bolt free. Remove the bolt so as not to drop the two crush washers that are on either side of the supply line.

Removing banjo bolt on fuel filter    Supply line at fuel rail

If possible, place a rag under the line at the rail to catch gasoline that remains in the rails and lines. Remove the two 10-mm hex cap screws that attach the supply line to the front fuel rail. Pull the line slowly but firmly away from the fuel rail to remove it. You may need to twist or wiggle it a little. The picture on the right above has the attachment at the fuel rail and one of the brackets that attach to the line circled. Remove this bracket also. There is also a bracket in the middle of the line that is not shown that needs to be removed. You might also be able to slide the lower part of the line through this other bracket. The picture shows some other components that I disconnected to get to the FPR and the return hose. That is not necessary if you are just working on the supply line.

Install the New Parts

1. Install the fuel rail adapter. Apply a small amount of engine oil to the o-ring for the EK2MFG fuel rail adapter and roll the o-ring onto the non-threaded end of the adapter. There is a recess for it to rest in. See the picture of the adapters near the top of this web page. Wipe the end of the fuel rail clean. Be sure no dirt or particles have entered the fuel rail or the adapter. Apply a little more oil to the o-ring and firmly, but slowly and evenly, press the o-ring end of the adapter by hand into the rail with the mounting holes lined up. Again, you may need to twist or wiggle the adapter very slightly to insert it completely into the fuel rail. If you are worried about dropping the adapter during this process (and you should be; I did; see below), tie a length of string to the threaded end of the adapter and/or place a shop towel under the rail. Put the split spring washers on the socket head cap screws and start the screws by hand several turns into the rails. Tighten the screws using a 5-mm hex key. It is the o-ring that seals the adapter to the fuel rail, not the face of the rail or the adapter. If you are worried about dropping the hex key, tie a piece of string to it to facilitate retrieval if necessary. Be very careful to not drop the adapter, the mounting screws, or the hex key into the abyss under the rails and plenum.

Fuel rail adapter installed

Well I did drop the adapter into the abyss (no string was attached). I removed the bolts that attach the wiring harness and the fuel rail, and the crossover loop, and carefully lifted the rail. I was very careful to not let the fuel rail insulators drop into the abyss also! I used a recovery tool that is about 2 feet long and consists of a flexible cable with a wire inside. On one end of the wire are four prongs. On the other end is a plunger. Push down on the plunger and the four prongs protrude from the cable and open up. Raise the plunger and the prongs grasp the object. I lucked out and was able to retrieve the adapter first try. What I did then was attach the adapter to the rail while the rail was off the engine.

Fuel rail adapter in the abyss

2. Replace the banjo bolt on the fuel filter. Earl's Performance makes an adapter (part number 991945) to replace the banjo bolt. I could not find that Aeroquip makes the same or similar adapter. Earl's also makes a banjo bolt hose end for -6 AN (only) Perform-O-Flex hose if you want to go that route and eliminate any other adapters at the filter. Part number 807691 has M12 x 1.25 threads (same as our banjo bolt) and a single hose end. Part number 807991 has M12 x 1.25 threads and double hose ends (the banjo bolt would be in the middle of the hose rather than at an end). The banjo bolt hose ends use an aluminum crush washer to seal against the fuel filter. The adapter I used below (M12x1.25 to -6 AN) uses Earl's Stat-O-Seal washer to seal the adapter against the fuel filter. Stat-O-Seal washers consist of a synthetic rubber o-ring mechanically locked to an aluminum washer. The o-ring makes a tight seal around the bolt shank without needing an o-ring groove being machined into the parts. The o-ring is good for temperature ranges of -85º F to +450ºF. This type of o-ring can be used as a replacement where copper or aluminum sealing washers are used.

Start threading the adapter by hand into the fuel filter. The adapter should thread by hand almost all the way into the fuel filter. Tighten the adapter using a -6 AN (or 11/16") open-end wrench. Only use 10-12 ft-lb of torque on aluminum AN adapters. The o-ring inside the aluminum washer is making the seal, not the washer or the threads. By the way, the opening you see in the banjo bolt is 3/16" (4.76 mm) across. The hole running the length of the shank is 1/4" (6.35 mm) across. The opening inside -6 AN adapters is about 1/64" less than 5/16" (or 7.54 mm) across.

Banjo bolt and its replacement    Banjo bolt hose end

3. Build the adapter assembly and attach. AN fittings seal either by the close contact of the 37º flared ends or with o-rings. The threads themselves never seal AN connectors. Also, never use thread sealant or tape on AN threads.

If using option 1 shown near the top of this web page, then attach that 90º connector to the fuel filter adapter. Hold the fitting at the location you want it and hand tighten the swivel female connector. Tighten the swivel until you can no longer rotate the fitting by hand. If using a banjo bolt adapter, there is nothing to do in this section.

If using option 2, then assemble the fitting on the workbench. Start by attaching the male flare union to the female swivel on the gauge adapter, if using that, or directly to a female swivel on the 90º fitting. If using the gauge port adapter, attach it to a female swivel on the 90º fitting. You will probably want the NPT port to face upwards.

If using a fuel pressure sensor, clean the NPT threads and assemble these fittings and adapters, using thread sealant on the NPT threads. Apply the sealant where you have determined the threads will mate. Do not apply sealant to the first or second thread near the opening of the fitting. You do not want sealant inside the sensor or adapter. Follow the instructions provided with the thread sealant. Some time may be needed for the sealant to dry after assembly. In the picture below you can see I used a little too much sealant. Attach the assembly to the adapter on the fuel rail. As always, start the threads carefully by hand and only use a wrench when you can no longer turn the female swivel by hand. You know you have the lower female swivel tight enough when you cannot rotate the 90º fitting and the assembly by hand.

Assembly with gauge port adapter    Thread sealant

3. Make the new hose. I attached the straight hose end to the hose before cutting the hose for final length. You could also measure the hose for length before attaching any ends. I cut the hose about 22.5" long. This gave me a little extra length to allow for the removal of the gauge port adapter in the future. Your hose length may be different than mine depending on what fittings and adapters you use at the fuel filter and what route you take through the engine bay.

Earl's Performance Plumbing Perform-O-Flex hose is an excellent replacement for the factory fuel hose in the engine bay. The figure below is from Earl's 2003 catalog.

Earl's Perform-O-Flex hose

The proper way to connect Earl's braid-protected hose is to attach the correct hose ends that will match the AN fittings on the fuel rail pressure adapter and the fuel filter adapter(s). Earl's recommends using their Swivel-Seal, Auto-Fit, or Auto-Mate hose ends. I used Earl's anodized Auto-Fit hose ends. These are available also as unanodized polished aluminum. Earl's provides excellent instructions for putting hose ends on their hose. Rather than trying to re-write these, I present a copy of their instructions.
Earl's Perform-O-Flex hose-end instructions
Here are some pictures of the hose end attachment process. Install the straight hose end first. This first picture is of one of the first hose cuts I made. It looks bad but it does trim up to work just fine. Later hose cuts were better. Be sure to wrap several turns of duct tape tightly around the hose. I used a piece of paper to protect the fittings from the steel vice jaws. In step 2, I used my fingernails to poke any short braid strands into the socket as I rotated the hose into it. After the hose is inserted all the way, and pulled back a small amount, be sure there are no loose braid strands that could enter the hose after assembly. In step 4, hold on to only the hose until the socket is started onto the nipple. Don't be afraid to use plenty of oil when asembling the parts. If the socket just will not start, pull the hose back a very small amount in the socket and try again. Be careful when starting the socket onto the nipple. I mildly cross-threaded one. I had an extra hose end so I just put the new socket onto the hose and started over - a bit more carefully. In step 5, you will need a 3/4" (or 19 mm) open-end wrench to tighten the red socket onto the nipple. The final picture in this set is actually of the upper return hose I made. Only the length is different than the supply hose.

hose cut    hose trimmed

socket in vice    nipple in vice

completed hose end

completed hose

With the fittings in place on the fuel filter and the fuel rail, route the hose through the engine bay where you want it go. Attach the hose loosely by hand at the fuel rail. Mark the replacement hose for length near the fuel filter using a piece of tape. The hose will extend about to the "far" end of red socket on each hose end. As I mentioned, I cut this hose 22.5" long. The exact length will depend on where you route the hose and the type of fittings and adapters you use at the fuel filter. Cut the hose and attach the 90º hose end as shown above.

5. Attach the hose. Route the hose through the engine bay and connect each end. Always start these fittings by hand and do not use a wrench until you can no longer turn the fitting by hand. Do not use excessive torque on aluminum AN fittings. Ten to 12 ft-lbs is sufficient. The seal is made at the 37º flared end, not in the threads. Tighten the swivel on the 90º hose end to the point that you can no longer rotate the hose end.

Lower part of supply line done

Upper part of supply line done


6. Pressure test. Double check that all the fuel lines are connected up. Re-connect the harness connector at the fuel pump in the rear storage compartment. Use the fuel pump check terminal to supply voltage to the fuel pump to pressurize the lines before starting the engine. If your battery was installed in the engine bay, bring it over close to the engine, perhaps sitting it on a table, bench, or chair. Remove the cap from the fuel pump check connector and insert a small paper clip. Connect a small-gauge jumper wire (14 to 18 ga is fine) with alligator clips on the end to the paper clip and to the positive battery terminal (or just touch the jumper wire to the battery positive terminal). Be sure you protect the positive cables from contacting the car body or anything metallic in the engine bay. Use a car jumper cable to connect the negative battery terminal to either the negative battery post or other good ground location in the engine bay. You should hear the fuel pump running. Carefully inspect your work for leaks - look and smell. Repair or rebuild any connection that leaks and repeat this test. I encountered no leaks.

If your battery has been moved to the rear compartment or you have re-wired the fuel pump directly to the battery, you will have to connect the battery to the positive and negative cables in the engine bay or rear compartment so that the fuel pump has current to it. You will still need to connect the fuel pump check connector as described above. Because my battery is in the rear compartment, I used my old Dyna-Batt to supply current to the check connector as shown in the lower picture below. I connected one end of the negative (ground) jumper wire to the firewall ground screw and one end of the positive jumper wire to the fuelpump check connector. I then just touched the ends of the jumper wires to the correct terminals on the battery.

Check connectors

Fuel pump check connector

Post-installation

1. Put stuff back. Reconnect any hoses or harness connectors and brackets you have disconnected. Re-install the battery tray and washer tank, being sure to reconnect the harness at the washer pump before you have lowered the tray completely and to reconnect the harness up by the check connector and the fluid tube. Re-install the MAS and air filter if removed (don't forget to re-connect the MAS wiring harness). Install the battery, connecting the negative cable last.

Catalogs

Earl's 1999 Product Catalog (14 MB): misc/earls_full_catalogue.pdf
Parker Fluid Connectors pipe fittings and adapters catalog (0.9 MB): misc/pipe_fitting_and_adapters.pdf
Truechoice catalog (8.5 MB); go to page 100 for Earl's fittings and adapters: misc/truechoice_catalog.pdf
Essex Parts catalog (2 MB): misc/earl's_fittings&hoses.pdf
Russell Performance Automotive Catalog: http://www.russellperformance.com/automotive/autocatalogpdf.htm


Back Home Forward

Except for the small gif and jpg images, the content, images, photographs, text, and multimedia displayed are Copyright © 2000-2004 by Jeff Lucius and K2 Software. All rights reserved. No part, section, image, photo, article, or whole of this site may be reposted or redisplayed without permission of the authors.
Page last updated January 16, 2004.