Quarter Trim Panel Removal
on the Mitsubishi 3000GT/Dodge Stealth
by Jeff Lucius
Overview
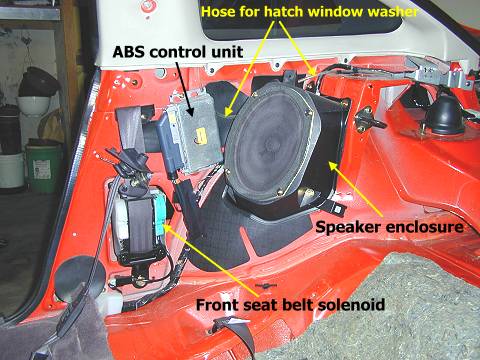
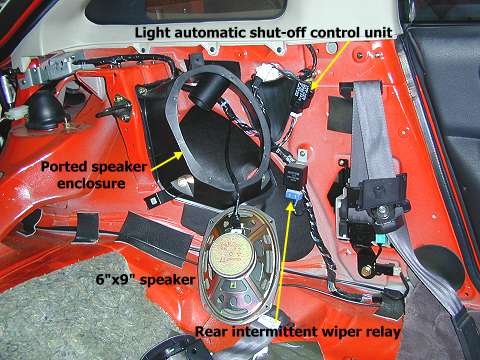
Removal of the quarter trim panels next to the rear seats provides access to several important components of the car:
- Anti-lock Braking System (ABS) control unit
- light automatic shut-off control unit
- keyless entry control unit
- rear intermittent wiper relay
- front seat belt solenoids
- rear 6"x9" speaker and its enclosure
- partial access to the hose for the rear window washer
- the door switch connectors
- mounting bolts for the side air dams
The tools required are a #2 Phillips screwdriver, a #2 Phillips offset screwdriver, a slotted screwdriver,
12-mm and 17-mm sockets, and a rachet with 3" and 6" extensions. I either replace screws and bolts in their holes after a part is removed or I use plastic storage containers or bags to keep all the little parts sorted and not lost. All pictures are placed near the end of this note.
Pre-Removal
It is not required, but you may want to remove the rear carpet, the rear floor cover, the spare tire and storage bins, and the rear trim panels. I have instructions for this at 2-rearstorage.htm. If you do this then skip the first three steps below.
Removal
The numbers in parentheses correspond to the numbered items in the figure below from the manual.
1. Shelf cover assembly (12). Remove the shelf cover.
2. Seats (11). Remove the rear seats. The bottom part of the seat is released by pulling on the two knobs located at the lower part of the front of the seat. Pull up and forward on the front part of the seat. The seat backs are fastened by three 12-mm bolts into the floor.
3. Covers (13) (14). Remove bracket that holds the shelf cover. Remove the cover over the seat back latch.
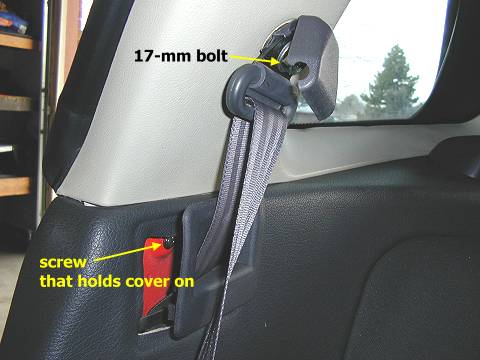
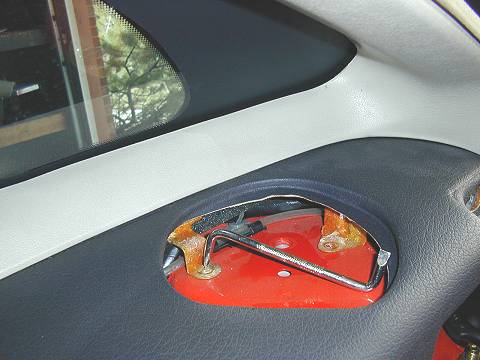
4. Front seat belt cover (15) and sash guide (16). Remove the Phillips screw that attaches the square cover that guides the belt through the quarter trim and pull the cover away from the trim panel. Unsnap the cover on the sash guide (pull out on the bottom of the cover). Remove the 17-mm bolt under the cover that attaches the guide to the pillar trim (above the quarter trim).
5. Front seat belt anchor (17). Pull the rubber cover away from the anchor plate (start at the bottom). Remove the 17-mm bolt that attaches the anchor plate to the floor.
6. Rear seat belt retractor (18). Remove the Phillips screw that attaches the cover to the retractor body below it. Use a slotted screwdriver or similar tool to carefully pry the retractor cover away from the quarter panel. Start at the front. Remove the 17-mm bolt that attaches the retractor to the car body and set the retractor and belt aside.
7. Scuff plate (20). Remove the rear-most screw from the plate and pull up on the plate to loosen it a little.
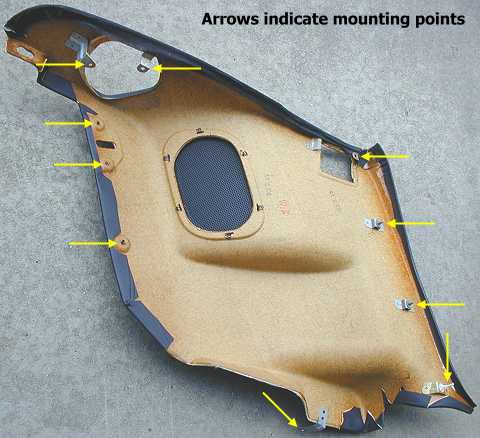
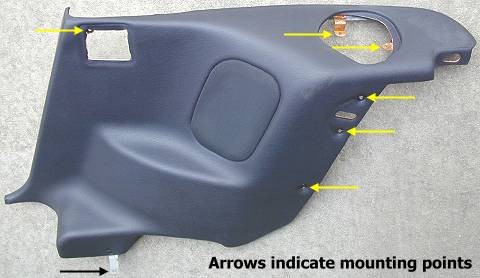
8. Quarter trim (21). Remove the remaining Phillips screws and bolts that hold the quarter panel to the body. These are indicated in the figures below. A Phillips offset screwdriver may be useful for the two screws under the retractor cover. Start at the front and pull the panel out releasing the three clips located near the front of the panel. Slide the front seat belt through the opening in the panel. Remove the panel.
Installation
For installation, just reverse the steps above.
Page last updated March 17, 2002.